Step By Step Guide To Migrate ASP.Net Applications To AWS Cloud.
Businesses and organizations in all types of industries are migrating their workloads to the Cloud. In this blog post, you will understand the series of things deep down. Let me list it down.
- How to migrate windows asp.net workloads to AWS cloud
- How workloads/websites hosted on Internet Information Services (IIS) on Windows Server can be migrated to AWS Cloud.
- Lift and shift approach for migrating on-premise to AWS Cloud. (In the Lift approach we use AWS EC2 service and in the Shift approach we will use AWS Elastic Beanstalk service)
Excited to learn? let’s get started.
Migrating ASP.NET applications to AWS EC2
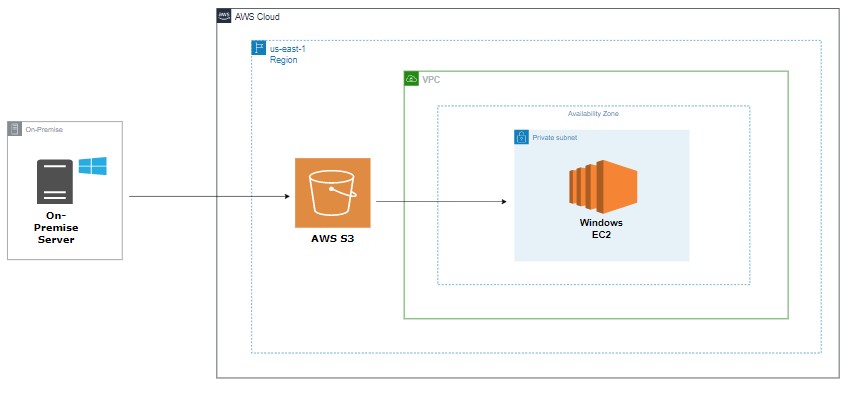
At first, you need to back up all the web application data from your on-premise server and then install AWS CLI in your server.
- · Configure CLI with IAM to get access to S3 bucket.
- · Once done, upload the data into S3 with the help of AWS CLI.
- · Provision Windows server EC2 in your desired VPC and install IIS and AWS CLI in it.
- · Configure AWS CLI in the VPC like the way installed it in the on-premise server
- · Download required files from S3 for your web application and configure the IIS sites and settings according to the web application.
- · Test the web application.
- · It’s done. that’s it.
Migrating ASP.NET applications to AWS Elastic Beanstalk
Elastic Beanstalk Environment makes things easier with Windows Web Application Migration Assistant to migrate ASP.NET. ASP.NET Core web applications from IIS on Windows servers running on-premises or in another cloud to Elastic Beanstalk. you can use Windows Web Application Migration Assistant tool to migrate both classic Web Forms applications, as well as ASP.NET MVC apps. Here let’s discuss how you can use this open-source tool to automate your migration efforts.
Prerequisites
- • Create a new IAM user if you don’t already have one in your AWS account. Remember to check the option for programmatic access since your user needs credentials. Attach current policies to this person directly on the permissions page, as seen in the screenshot below. Select the following 3 AWS-managed policies as shown in the below .
IAMReadOnlyAccess- AdministratorAccess-AWSElasticBeanstalk
AmazonS3FullAccess
- Make sure you have IIS 8 and above running on Windows 2012 and above.
- PowerShell version should be 3.0 or above. Make sure the latest version of AWSPowerShell module is installed. You can install the module
Install-Module AWSPowerShellcmdlet. - You also need Web administration module for MS PowerShell, you can check it’s dependency by running the PowerShell command
Import-Module WebAdministration. - The script needs to run as a local administrator on your web server. Make sure you have appropriate credentials to run it. If you are logged in with a user other than a local Administrator, open a PowerShell session window as an administrator.
- Make sure your server has unrestricted internet connectivity to the AWS IP range.
Setting up
- Open a PowerShell terminal on your Windows Server and run the following two commands.
PS C:\> Import-Module AWSPowerShell
PS C:\> Set-AWSCredential -AccessKey “IAMUserAccesskey” -SecretKey “IAMUserSecretKey” -StoreAs “Profilename”
- Download Windows Web Application Migration Assistant zip from Github and extract it to the folder.
- Open that folder and run
.\MigrateIISWebsiteToElasticBeanstalk.ps1
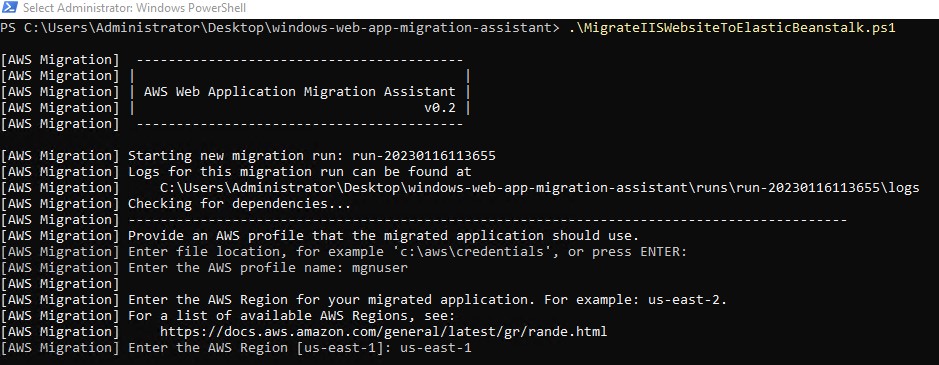
- Pres Enter to skip AWS credentials file location
- Enter same AWS profilename you have given above.
- Enter your desired AWS Region
- After the region specification, the migration script started scanning for web applications in your server. Then, you can choose one of the discovered web applications by entering its application number as shown in the list.
- After selecting the web application migration, assistant will start to take snapshot of your application.
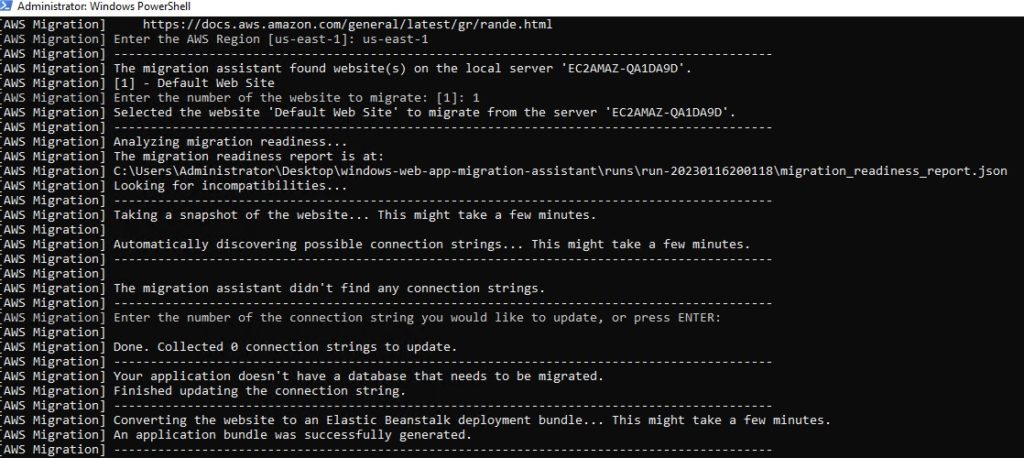
- If your application uses any backend connection strings to connect to your database, the migration assistant prompts you to change those connection strings. You can skip this step, however, you will need to update manually in the future.
- Once it’s done, migration assistant will create an application bundle that can be deployed into Elastic beanstalk environment.
Configuring Elastic Beanstalk Deployment using the script:
Once the application bundle is created, the migration assistant will ask you to give unique name for your Elastic beanstalk application. Next it will prompt you to select Windows version and EC2 instance types for your Elastic beanstalk application. Add Load balancer if required.
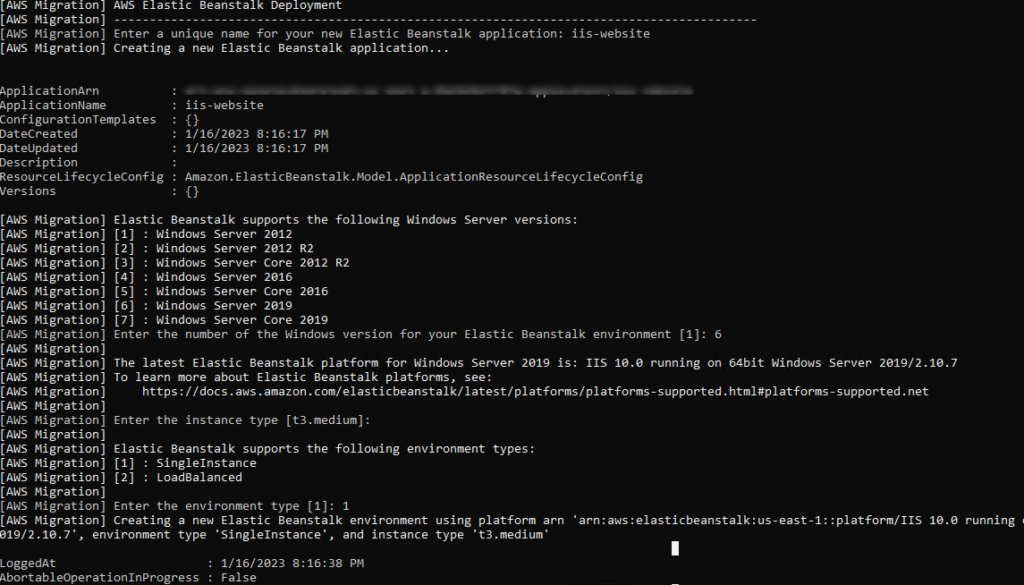
After few minutes, you will find your application will be running in the Elastic Beanstalk application. Hurrah!
Note: By default migration script will create you elastic beanstalk in default VPC of selected AWS region.
Advanced Options
If you want to deploy your application in custom VPC with custom features, then stop the application when the below screenshot is shown in your monitor. Or else, it will start running for default options and settings.
An application bundle was successfully generated.
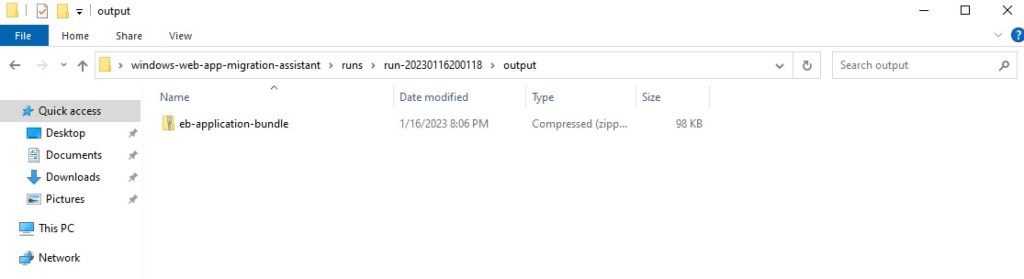
Finally, go to web application migration assistant folder, go to the following path \runs\run-20230116200118\output and copy the application bundle zip file. Use the zip file and upload it into your custom provisioned Elastic beanstalk application.
Wrapping Up
Hope you understand how to migrate ASP.NET applications to the AWS cloud with this article. To make your understanding better and easier, we have added some screenshots in it. We believe it helps you to identify where you are in the entire process.
We continuuminnovations, provides prominent cloud solutions to various industrial sectors around the globe. Our cloud experts understand your business requirements and come up with the highly personalized strategies.